Creating an app in 7 simple steps
To create an add-on tool for Repair, simply follow the 7 steps below from Registration to Launch and Growth!
- Register
- Develop
- Review
- Production Testing
- Market
- Launch
- Grow
1. Register
The first step to building an add-on tool is to register with the RepairCenter Partner Network. Registration is a two step process:
- Register as a partner - you can register as a partner from the portal. By accepting the terms and conditions of our SDK license agreement, you will be provided with a RepairCenter sandbox and access to all of the developer portal features, functionality, and documentation.
- Register an application - before you can begin utilizing our API, you must register the application you plan on building. By registering an application, you will be provided with the necessary credentials (AppID and App Key) to access the RepairCenter API's.
What's included in the SDK:
- Dev Portal account - once registered, you will have access to the Mitchell developer portal and all the documentation. RepairCenter tracks our partners by company. If multiple developers at your company may need access to our developer portal, you should set up a single, shared account with the Mitchell developer portal.
- RepairCenter sandbox - The RepairCenter sandbox is a pre-release version of RepairCenter designed for your development and testing purposes. See the RepairCenter Sandbox section for more details.
- App ID - the app ID is your application's unique id key within the RepairCenter licensing tool. Your add-on solution may have multiple navigation nodes (e.g. global tab, local tab, etc), and each navigation node will be assigned a unique AppID. The AppID ensures that you are only able to access data for shops that have been licensed with your appID(s).
- App Key - the app key is your application's unique id key for secure authentication. Each registered application will have a unique app key. If you are building multiple applications, you will need to register for multiple app keys. Also, note that a single app key may be associated with multiple appID's (see diagram below)
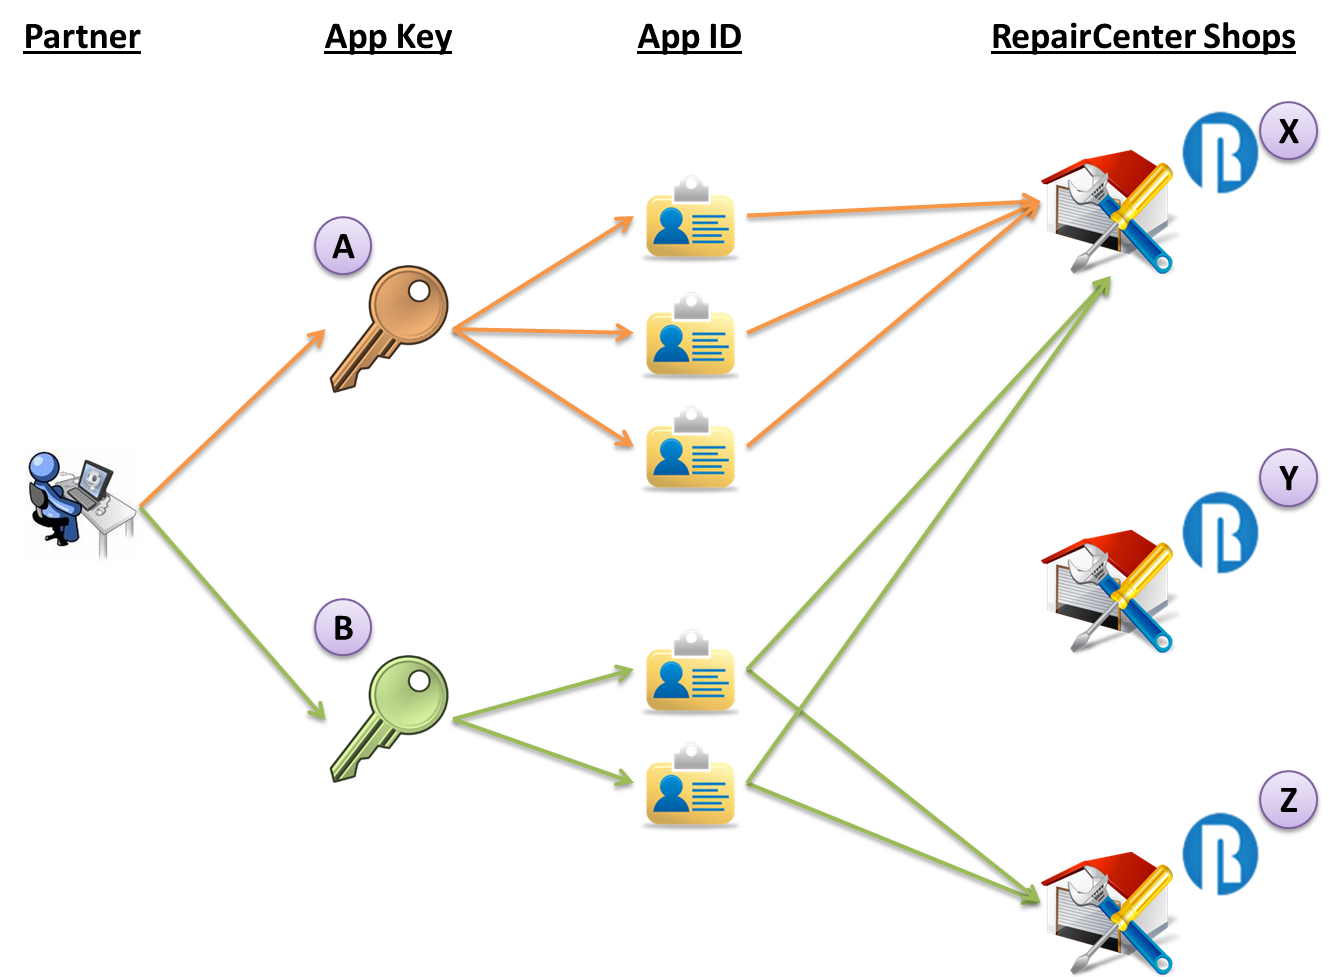
The diagram above shows the relationship between the partner, the registered app key, their app id's, and the shop. In this diagram, the partner has registered two applications - app A and app B. App A has three navigation nodes (and therefore 3 app ID's), and app B has two navigation nodes. Shop X has licensed both applicatoins, shop Y has licensed none, while shop Z has licensed only app B. In this example, App A has access to only shop X's data, while App B has access to Shop X and Shop Z's data. Neither App can access shop Y's data.
In addition to the SDK license agreement, there is an additional Reseller Agreement to govern the business terms of your application. The reason we've separated the Reseller Agreement from the SDK license agreement is to expedite the development life cycle. The SDK license agreement allows you to begin building out your application, even as you continue to review and finalize the monetary terms of the Reseller agreement. The Reseller agreement must be completed prior to Marketing your app. Click here to view a generic sample of the Reseller Agreement
2. Develop
The RepairCenter Partner Network is designed to allow 3rd party developers to enhance and supplement existing RepairCenter functionality. In order to facilitate your design process and streamline the user experience, we’ve put together the following guidelines.
A. Business Criteria
- Deliver value to the shop user
- Deliver an integrated experience via the RepairCenter workspace
- Access only the data explicitly required to enable the Add-On Tool
B. Functional Criteria
- Workflow
· Single Sign On – The Add-On Tool should remember the users login credentials and provide a seamless user experience.
· Account Management – Account settings for the Add-On Tool should be managed within the Add-On Tool’s global navigation.
· Integration – The user should not be required to re-enter any existing RepairCenter information into the Add-On Tool. Any existing data should be retrieved via the API and pre-populated.
· Performance – the overall user experience from navigation to page display should not exceed four (4) seconds. For reporting and/or search queries, the user experience should not exceed ten (10) seconds.
- User Interface
· 
All Add-On Tools must include a global navigation node in the RepairCenter ToolBox. The RepairCenter Toolbox allows the user to identify which Add-On Tools their shop is currently licensed for, and find relevant help and support content regarding the Add-On Tool.
· Horizontal tabs – Secondary and Tertiary tabs within a navigation node should be displayed horizontally across the top of the page, from left to right. This retains consistency with the RepairCenter UI framework
· Your Add-On Tool should not allow the user to navigate away from your solution. The Add-On Tool must function as a self-contained application, separate from the rest of the web.
· If your Add-On Tool provides solutions within the context of a single job, your Add-On Tool should also have its own local-tab navigation node. The local tab navigation node allows the user to utilize your solution within the context of their workflow.
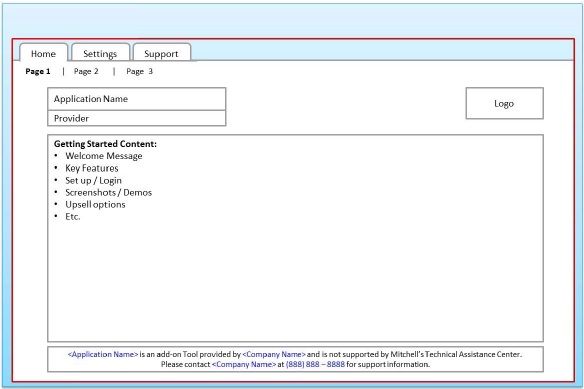
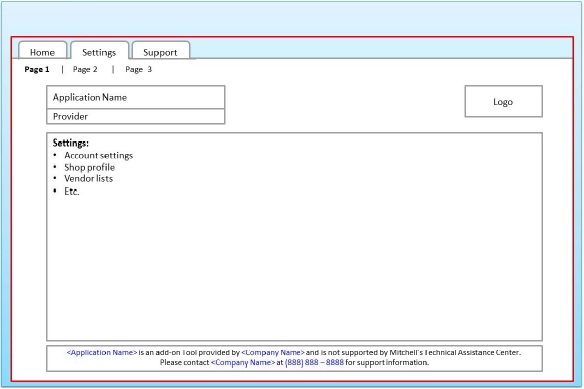
· Support disclaimer – the following disclaimer must be conspicuously displayed on each page of your add-on tool:
<Application Name> is an add-on Tool provided by <Company Name> and is not supported by Mitchell’s Technical Assistance Center. Please contact <Company Name> at (888) 888 – 8888 for support information.
Your global tab should look similar to the following lay-out:
Home – Getting Started:
Settings:
Support:
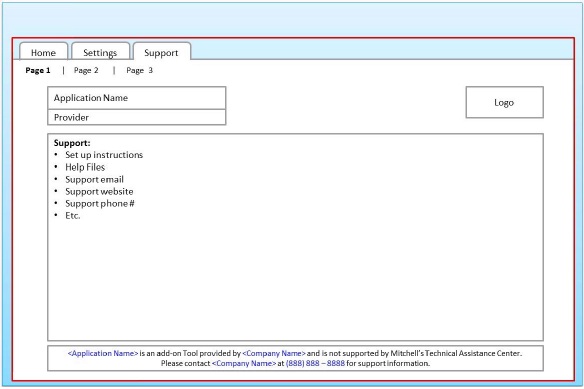
ü Support
· You are responsible for providing all training and documentation, setup, help and support information. Mitchell TAC will only provide support for the ToolBox itself and the licensing of your add-on tool. If an end-user calls into Mitchell TAC with a question regarding your add-on tool, they will be instructed to contact you via the support information provided on each page of your add-on tool.
· The following information must be displayed within your add-on tool prior to approval:
- Set up instructions
- Support email
- Support phone #
- Support website (optional)
C. Coding Criteria
- Data fields – As part of the approval process, you need to specify the type of data fields your Add-On Tool will be reading and/or writing to RepairCenter, along with the business value for utilizing such data. Your code base should only access the necessary data fields.
- Paging – The RepairCenter API currently throttles incoming calls by limiting the # of returned line items to 100 lines. If your application expects to receive more than 100 lines from any single call, you must implement the necessary code for paging.
- Asynchronous calls – The RepairCenter API consists of multiple services. If you are requesting information for a single job across multiple services, it is recommended that you make these calls asynchronously in order to maximize performance speed.
- Frequency – The current RepairCenter API is designed at the transactional level to facilitate a user-initiated action. If the user is initiating the call, your Add-On Tool can send the request whenever the action is initiated. If your Add-On Tool is looping through your shops to retrieve data on the back-end, the API call is restricted to once a day on a nightly basis.
Note that we are implementing designs that will allow for more frequent data access across your shops. Utilizing the transactional API to retrieve data across multiple shops is an interim solution. As we deliver the more robust reporting API’s, we will no longer support the nightly sweep transactions.
- Hours
- RepairCenter’s maintenance windows are as follows:
- Monday – Saturday 10:00 PM PT – 2:00 AM PT
- Sunday All Day
- If your Add-On Tool is retrieving data during off hours, you should be making your calls between the hours of 7:00 PM PT – 10:00 PM PT
3. Review Process
Prior to production, you must submit your Add-On Tool for approval. Your Add-On Tool will be reviewed against the above Business, Functional, and Coding guidelines mentioned above. Ultimately, Mitchell reserves the right to approve or reject an Add-On Tool at our sole discretion. The approval process may take a couple of weeks depending on the amount of information to review.
- Email developer.support@mitchell.com with a subject line of “<App Name>_Review_mm/dd/yy” ; the email should include the following attachments:
- Approval Form (download here)
- Any portion of your code that utilizes our API
4. Production Testing
Upon approval, you will be issued the necessary items for production deployment.
- Production Environment –This test shop will be set up identically to your sandbox environment, but will be on our production servers. You should use this shop as a support environment to reproduce any production issues reported in the field. Note that you cannot run the sandbox and the production version of RepairCenter on the same machine. It is highly recommended that you maintain separate environments for development and support purposes.
- Production Credentials – You will receive a new App Key and AppID(s) for the production environment. You will need to insert these new credentials prior to production deployment.
- Production URL – You will also need to switch your code from the api.repaircenter-uat.mitchell.com url to api.repaircenter.mitchell.com
Once you’ve switched over the necessary credentials, you should deploy your code to production and test your Add-On Tool in your production test shop. As part of the production test process, you will also be required to provide Mitchell 3 test accounts to verify the functionality.
Once the add-on tool has been tested and approved in Production, the next step is to set up a pilot test. You will work together with your Mitchell representative to identify mutual customers, and conduct a beta test to verify that the functionality performs as expected and meets customer needs in a live production environment.
5. Market
The RepairCenter ToolStore allows our shop users to view available Add-On Tools from within the RepairCenter application. In order for your Add-On Tool to appear in the ToolStore, it must be at least in an open beta (advanced access) stage of development – this means that the shop can begin utilizing your application if desired.
Marketing Disclaimer – All marketing content and claims regarding the Add-On Tool are provided solely by the partner. The marketing content must accurately represent the Add-On Tool and the provider. Mitchell is not responsible for and does not endorse any marketing claims made by the partner. Mitchell reserves the right to approve and/or reject the marketing content at our sole discretion.
To submit your marketing form, download the marketing form here, and email the completed form to developer.support@mitchell.com with the subject title “<App Name>_Marketing_mm/dd/yy”
Note: It is recommended that you do not use or mention any Mitchell trademarks (logos, products, etc) in your marketing content. Your marketing content will appear within the Mitchell web page and the RepairCenter ToolStore, which clearly indicates the affiliation with Mitchell. Utilizing our trademarks will require a lengthy approval process.
6. Launch
Once all of the above items are complete, your application is ready to launch. Mitchell will enable your Add-On Tool in the ToolStore, and your reps can begin selling your Add-On Integration. Shops will interact with your add-on tool in the following manner:
- ToolStore Listing – once live, your Add-On Tool will be listed in the RepairCenter ToolStore. Shop users will be able to view the marketing content for your Add-On Tool from within RepairCenter.
- Purchasing – To enable the Add-On Tool, the shop can order your application directly from the ToolStore. Once ordered, the shop will refresh their licenses and begin using your add-on tool immediately.
- Getting Started – upon navigation to the Add-On Tool, the shop will follow your instructions for setting up their account and getting started.
7. Growth
As with any good product, your application will need to continually adjust and improve to meet changing customer needs. As you make changes to your appliction, you must re-submit your application for approval prior to updating your application in production.