div class="api-method-description">
API Platform Features
Data limits have been placed on the Partner API to protect our servers.
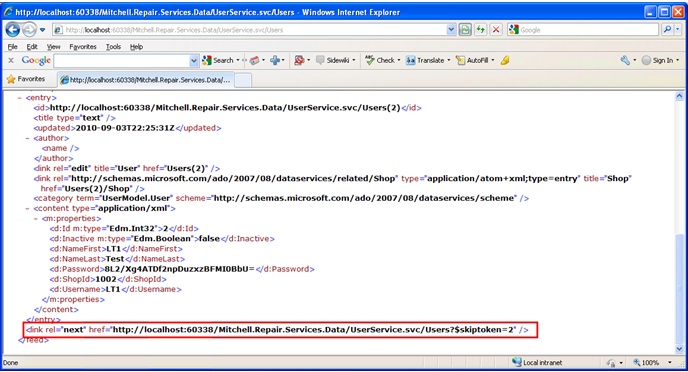
The paging limit on all of our API services is set to 100 records at a time. When our API service receives a query that exceeds this limit, it issues a partial response. The partial response includes as many results as possible without exceeding the limit. Included in the response will be a “link” that tells the client how to retrieve the remainder of the results.
We recommend using DataServiceCollection in .NET when working with paged results on the client. Below is an example of how to use DataServiceCollection that retrieves all the users from the User API service.
string baseApiUri = Request.Headers["base_api_url"];
string userSvcUri = string.Format("{0}{1}RepairOrder/ShopService.svc",
baseApiUri, baseApiUri.EndsWith("/") ? string.Empty : "/");

// create context
UserApiService.UserEntities ctx = new UserApiService.UserEntities(new Uri(userSvcUri));

// add event handler where we will add shop id to the header
ctx.SendingRequest += new EventHandler<SendingRequestEventArgs>(this.Context_SendingRequest);
DataServiceCollection<UserApiService.User> pagedUsers = new DataServiceCollection<UserApiService.User>(ctx.Users, TrackingMode.None);

while (pagedUsers.Continuation != null)
{
  pagedUsers.Load(ctx.Execute<UserApiService.User>(pagedUsers.Continuation));
}
Sample paging through data using DataServiceCollection
It is not necessary to always use the DataServiceCollection when working with paged results on the client. The QueryOperationResponse object returned from DataServiceQueries also contains the Continuation token needed to make progress on a partial set. The following examples show the sample actions as in the previous example but this time without the DataServiceCollection.
string baseApiUri = Request.Headers["base_api_url"];
string userSvcUri = string.Format("{0}{1}RepairOrder/ShopService.svc",
baseApiUri, baseApiUri.EndsWith("/") ? string.Empty : "/");

// create context
UserApiService.UserEntities ctx = new UserApiService.UserEntities(new Uri(userSvcUri));

// add event handler where we will add shop id to the header
ctx.SendingRequest += new EventHandler<SendingRequestEventArgs>(this.Context_SendingRequest);
var query = ctx.Users.Execute();

//load the customers into a list
List<UserApiService.User> pagedUsers = query.ToList();

//check for the continuation token
DataServiceQueryContinuation continuation = ((QueryOperationResponse)query).GetContinuation();

while (continuation != null)
{
   //query for the next partial set of users
   query = ctx.Execute<UserApiService.User>(continuation.NextLinkUri);

   //Add the next set of users to the full list
   pagedUsers.AddRange(query.ToList());

   //get new continuation object
   continuation = ((QueryOperationResponse)query).GetContinuation();
}
Sample paging through data using DataServiceQueryContinuation
If .NET is being used to write the application, download the Mitchell.Repair.Services.Partner.Core.dll assembly from the developer portal (compatible with .NET 3.5 and 4.0). In this assembly, we have defined the http header keys and status code values that you might find helpful while developing the application. We strongly recommend using the code provided in the Core.dll for setting and retrieving header and URL parameter values.
-
Use the ClientHttpHeaders class to access header key definitions that RepairCenter sends in a web request:
string token = Request.Headers[ClientHttpHeaders.HttpRequestHeaderAuthToken] as string;
-
Use the ClientHttpQueryParam class to access query string key definitions that RepairCenter sends in a web request:
string userId = Request.QueryString[ClientHttpQueryParams.HttpQueryParamUserId];
-
Use the PartnerAppHttpStatusCode enumeration to get status headers:
Response.StatusCode = Convert.ToInt32(PartnerAppHttpStatusCode.ResendHeadersRequest);
-
Use the ServiceHttpHeaders class to for header key definitions that your application will send to the RC Partner API :
request.Headers.Add(ServiceHttpHeaders.HttpRequestHeaderShopId, "12345");
If a Visual or Composite Applications needs to enable a single sign on experience within RepairCenter, follow these steps:
- Get the logged user id from the web request’s query string
- To retrieve the user information, you can call the RepairOrder/UserService.svc to get additional data for this user id
- Match the RepairCenter User/Shop combination with the application user records.
- The first time the shop navigates to your App within RepairCenter, your App does not recognize the ShopId and therefore requires the user to log into their account (username/password).
-
Once logged into their account, the user should be prompted to set up their RepairCenter interface. This interface should ask for at least the following information:
-
RepairCenter ShopID
-
RepairCenter Username
-
Other Shop information (zip code, shop name, etc.)
-
-
Once entered, you App can verify that the data entered matches the data retrieved via the API (Use the Shop Service and User Service)
-
Once verified, the interface is established, and your App stores the RepairCenter ShopID against the users account in a lookup table.
-
The next time the user launches RepairCenter and navigates to your App, the App recognizes the RepairCenter shopID and automatically signs the user into their account.